
I developed a technique in 2007 during a Keyline Design Course at Tuscon, Arizona for making a contour map using cheap available materials. One of our students didn’t have the cash to get a surveyor to do the job on his 40 acres, so I came up with this solution on the whiteboard and have since tested it on the ground quite a few times now.
- Using a Bunyip/Water Level, A Frame, Laser Level or Dumpy/Automatic Level mark out a contour line using stakes or pin markers (see below for an alternative to this technique in some circumstances).
- Using a Bunyip/Water Level, Laser Level or Dumpy/Automatic Level go down or up the desired elevation (eg. 1 foot or 0.5m) more or less stepping down (or up) each contour interval and then running along until you run out of signal (laser) or come to a boundary or obstruction.
- Using a consumable GPS (I have a Garmin Etrex HCx – about $200 worth) record waypoints at each of the stakes. Be sure to wait for the GPS to ’settle down’ reducing its error down to between 1-3m. Hold the GPS out in front of you over the stake and then take the waypoint. You can also take waypoints of important features such as rocky outcrops, dam perimeters/maximum water levels, fences, pipes, buildings, tree drip lines etc remembering to codify/name each point so that the points can be distinguished from you contour points.
- You can choose not to use stakes if you like by marking the waypoints directly onto the GPS as you mark each contour point. This reduces the time needed to survey dramatically. If you have livestock then you will most certainly lose many of the stakes anyway as their curiosity gets the better of them!
- Using a measuring wheel (or paces if you’re good!) take some ‘ground truthing’ measurements across the site. This will be useful later when you want to rough out the ‘coefficient of error’ from the GPS as there will always be with a consumable model….
- Then load the GPS data onto computer. Most GPS units come with a basic mapping program or you can (as I do) use a program like MapInfo Professional, or other GIS or CAD programs. The waypoints will come up marking the pattern of the contours. You can then join the dots and presto you have your contour map.
- The image above is an example of the results. For this job I only needed a few contours. The accuracy came in at between 1-3m which over 10 hectares acres is fine in my opinion.
- We also now import GPS points directly in Google Earth for immediate viewing. Go to TOOLS then GPS, click off ROUTES & TRACKS leaving ‘WAYPOINTS’ ticked, then click IMPORT. Good idea to make a new folder in Google Earth by selecting ADD then FOLDER. Name the Folder of the Property/Owner name and date etc.. (Or just keep them as whatever Google Earth calls them if you just simply import them.) Click on the new folder so it is active and now go through the GPS points importation procedure as described.
- The points will then be shown on your Google Earth map. These points can be exported into programs such as MapInfo Professional by saving these points either individually or as a folder in Google Earth as .kml/.kmz and then using KMLCSV freeware (available at www.kmlcsv.pbworks.com). You then import these points into MapInfo using the Create Points function and then open them in your mapper as a .tab file. Other GIS software provides for a similar process.
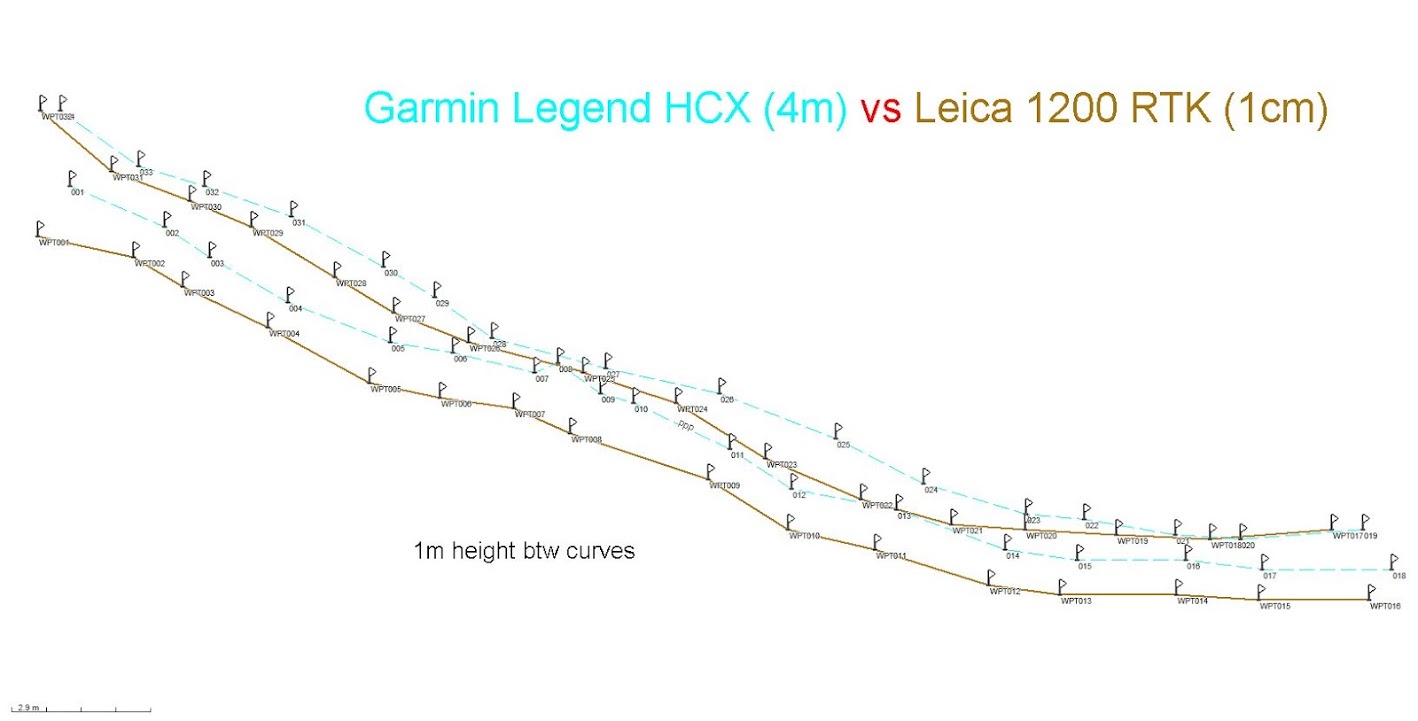
Diagram 1 – This map shows the differentials in accuracy the technique described above and where you use an RTK GPS instead. Thanks Jesús Ruiz Gámez of Linea Clave (Spain) for this test.

Diagram 2 – This map is at Dalpura Farm in southern Victoria (AU) where we completed a GPS/Laser Level-derived survey ahead of an wide-spaced agroforestry being designed and established.
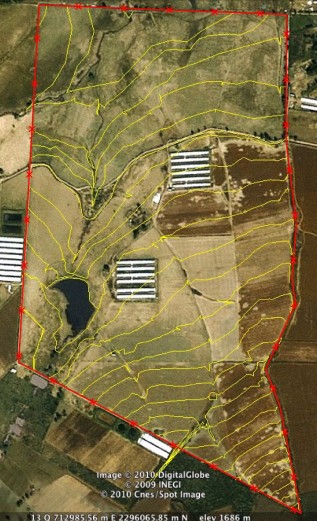
Diagram 3 – Following our site analysis, Eugenio Gras of MasHumus surveyed this 200ha property in 3 days using a GPS/Laser Level and then sent me the plot as a GoogleEarth .kmz file which I then imported into MapInfo Professional and designed the project.